Setting up the Tenda N301 router , Easy Method
Contents
Setting up the Tenda N301 router
Preparatory work
Just before moving on to setting up the Tenda N301 router, you will need to perform a few simple steps related to connecting and choosing a location for this network equipment. Unpack the device and connect it to the computer. If you are doing this operation for the first time, perhaps the instructions provided at the following link will be more than ever useful.
Right during the connection, you need to decide on one more factor: the location of the router in an apartment or house. If computers connect to it only via a LAN cable, there is no difference in the chosen location, but when connecting via Wi-Fi, this plays an important role, especially in a large room.
In the material where we talk about amplifying the signal of the router, there is a visual explanation of how the chosen location affects the quality of the signal and what electronic devices can affect its deterioration. Check out this information if you haven’t already found a place to install Tenda N301 or if you want to do it the smart way.
Authorization in the web interface
Logging into the router’s web interface is another important step that is performed before the main configuration step. The fact is that it is in this menu that further settings are made, so it is so important to figure out the correct entrance to it. To do this, you must determine the login, password, and address that are entered in the web browser. This topic is covered in a separate guide on our website, which describes the available methods for finding information.
Manual configuration of the Tenda N301 router
Once you have read and implemented all the steps described above, you can safely move on to configuring the Tenda N301 router. We have broken down the entire process into sequential steps to make the configuration easier to understand. In addition, we will clarify that the instruction is based on the latest version of the web interface, where the Quick Setup Wizard is still missing, so the actions will have to be done manually, which complicates the operation a little but is still quite possible for a beginner to cope with.
Step 1: Connecting to a network (WAN)
The first stage of the general configuration of the router is connecting it to the network of the provider, on which access to the Internet depends. The whole difficulty of this step lies in the need to obtain information from the Internet service provider if he does not provide special instructions for setting up the connection. However, let us go through everything in order, taking into account each modern protocol.
-
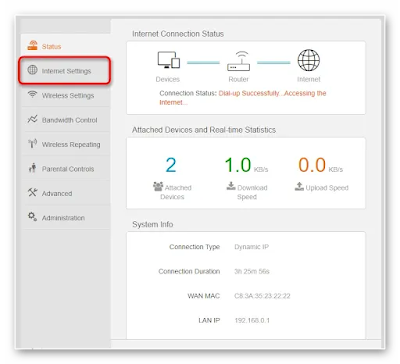
- After successful authorization in the Tenda N301 web interface, go to the “Internet Settings” section.
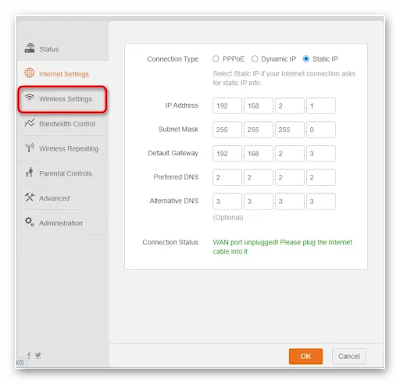
- Contact the provider’s technical support or find instructions on the website or in the contract yourself to find out what type of connection it uses. Let’s start with a static IP address. To configure this protocol, mark the corresponding item with a marker.
-
- Set the vendor-supplied IP address, subnet mask, default gateway, and DNS servers. Before saving, be sure to check the information, since an error in even one digit provokes connection problems.
- If we are talking about the dynamic IP address protocol, which is now the most popular just because of the ease of connection, set the marker at the item “Dynamic IP“ .
- You don’t need to edit anything in this protocol, which will be discussed in the web interface window, so just apply the rest of the changes, wait a few minutes until the router reboots completely, and then check network access.
- In the Russian Federation, the PPPoE protocol is still popular, and to activate it, the provider assigns a username and password to each client. Find this information in the documentation you received or contact support directly. In the settings menu, enter your details and save the changes.
After completing this configuration step, the router will need to be rebooted, after which access to the network should be obtained, but provided that all actions are performed correctly. Open any web browser and check how sites open. If you suddenly have problems opening all sites, return to this menu again and make sure that the selected settings are correct. To be sure, call technical support and ask to check your line.
Step 2: Wireless network (Wi-Fi)
In today’s world, almost every apartment or house has at least one device that connects to the router via Wi-Fi, whether it’s a laptop, tablet, smartphone, or even a personal computer with an additionally purchased adapter. In this case, be sure to configure the wireless network through the Tenda N301 web interface, for which do the following:
- Open the “Wireless Settings“ section by clicking on this button on the panel on the left.
- Activate the wireless network by moving the corresponding slider.
- Start setting up Wi-Fi, starting by changing the name of the network with which it will appear in the list of available ones. Check out Tenda’s unique network hiding feature by reading its description and enabling/disabling as needed.
- Expand the “Security Mode“ drop-down menu and select the recommended security type for your wireless access point.
- Set a password for it with at least eight characters. Each device will need to enter it the first time they connect to Wi-Fi.
- Go down to the block “Wi-Fi Signal Strength“ , and make sure that the marker is set near the item “High“ . This parameter is responsible for the power of the transmitter. If it is at a low value, the coverage area is noticeably reduced, so it is important to provide the best signal.
- If you want to make the access point work only at certain times, set up a schedule. To get started, activate it, then specify the allowed time and days on which you can connect to the network by ticking each of them.
- WPS is a feature that allows you to connect to a router without entering a password by pressing a dedicated button on the case or entering a PIN code. In this section, activate this mode, and in the future, new equipment will not have connection problems. This technology is available in almost every modern router, so you need to know all its subtleties and rules of use, because it greatly simplifies the process of connecting to a wireless network. Detailed information about WPS can be found in another article on our website at the link below.
- You do not need to change the Wi-Fi settings, but if you ever need to set the channel frequency or change its number, refer to the same section in the web interface, remembering to save the new settings.
To check the wireless access point settings, prepare any smartphone, tablet or laptop, open the list of available networks and connect to the newly created one by entering the set password. Immediately after the connection, you can use the Internet in normal mode. If you have not previously experienced connecting a router to a phone or laptop via a wireless network, the following instructions will help you understand the correct implementation of the task.
Step 3: Manage Connected Devices
Tenda N301 has a menu designed to control connected devices, so we decided to briefly mention it, talking about the configuration options present, which is especially true for those who really control each equipment.
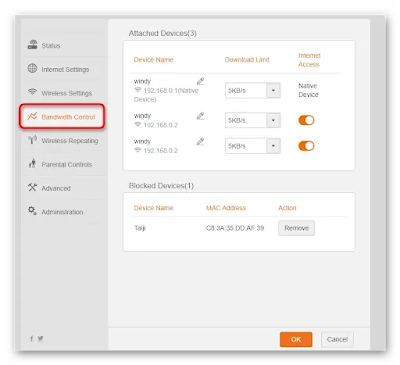
- To start monitoring and managing, open the “Bandwidth Control” section .
- Pay attention to the pencil icon, which is designed to rename connected devices. They all have their own, unchanging MAC address, so a renamed PC or smartphone will always show up here with the same name. Thanks to this, you will not get confused with further management.
- The next configuration option is to set a speed limit for downloading, which is useful in situations where several computers are connected to the router at the same time and each user wants to download something from the Internet. Turn off the limit or customize it the way you need by setting a personal limit for each device.
- If necessary, switch the slider opposite the name of the devices to disconnect any of them from the network. Just keep in mind that after that they will have to reconnect, but you will not be able to manually connect through the same menu.
- The last category of this window is blocked devices. Manage them by expanding this list, or remove previously added equipment.
Step 4: Using the Router as a Repeater
The Tenda N301 router model under consideration can be used as a repeater, connecting to an existing Wi-Fi network to access the Internet. The developers offer a choice of three different modes at once, each of which has its own characteristics. Let’s deal with all of them in order to understand when and which one will need to be applied.
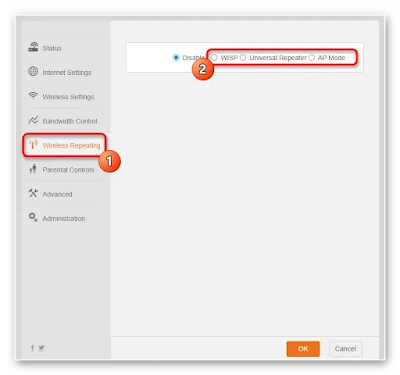
- Open the “Wireless Repeating” menu , where you select one of the repeater options, after which its settings will appear on the screen.
- First, let’s look at the most interesting mode called “WISP” . Its original purpose was to provide a backup connection to any Wi-Fi network in case there was a problem with the wired connection. However, now you can simply select the appropriate network from the list and connect to it immediately. This mode is also suitable for connecting to open networks without worrying that traffic can be intercepted.
- We will not analyze the universal repeater in detail, since it does not have any features. Its configuration is carried out in much the same way as in the case of the first mode, but at the same time, automatic switching will not be performed in case of loss of access to the WAN. If we talk about “AP Mode” , then it works as an excellent means of expanding the network coverage area. Activate it and connect Tenda N301 to another router using any free port, and the settings will be automatically picked up.
Don’t forget that if you are not using the repeater mode, it must be disabled by placing the marker in the appropriate position. Otherwise, you may experience problems receiving a signal through the WAN.
Step 5: Parental Controls
The main drawback of the current version of the Tenda N301 web interface is the lack of an advanced security system that would offer to block device MAC addresses or filter IP. The developers decided to add only parental control, allowing you to manage the activity of already connected devices. If you are interested in setting restrictions for one or more computers or smartphones, follow the following algorithm:
- Open the configuration menu by clicking on the inscription “Parental Controls” .
- See the list of connected equipment. Manage it or track connection time to determine which name belongs to a particular machine. We have already said above that devices can be renamed so as not to get confused in further management. Disable any of them by moving the switch from the “Manage” column .
- Access settings are implemented in much the same way as it was with the activity of the wireless network. Select the allowed time and days for which it will be active by ticking each item.
- You can do without a schedule if you only need to restrict access to certain sites. To do this, select an allow or deny rule, and then make a list of all web resource addresses that you want to restrict or allow.
In addition, we clarify that when using parental control rules, it is recommended to change the login and password from the web interface so that the child cannot independently influence the settings, thereby bypassing the prohibitions. We will talk about this in the final stage of setting up Tenda N301.
Step 6: Advanced Options
Those parameters that are unlikely to have to be changed by an ordinary user, the developers of the router’s web interface have moved to a separate menu, which contains all the settings that are not included in any of the previous sections.
- To get started, open the “Advanced” section .
- The first block is called “Static IP” and allows you to add any device by assigning it a static IP address. This is necessary to add equipment to the list of blocked or set personal rules in a third-party firewall. You will need to know its MAC address, and in this menu all that remains is to assign a static IP and set a name.
- The next block of settings – “DDNS” – is responsible for connecting an account to obtain a dynamic DNS address. Most often, this is required by those users who want to assign a domain name to the router or perform other manipulations with it on their local server. An account is registered on one of the special sites, and then its data is entered in this block and a connection is made.
- Users who need to change the parameters of the DMZ or enable universal Plug and Play support can do this in the last two blocks of the menu in question.
Perhaps in the future, some parameters from here will be transferred to thematic sections, where the number of settings will increase significantly, but for this you will have to wait for the release of a new firmware, if the developers are working on it at all.
Step 7: Administration
The final step in configuring Tenda N301 is administration settings. This includes the standard features that are present in every router web interface, but there are also a few interesting points that we also propose to deal with.
- When setting up parental controls, it has already been said that it would be nice to change the password for accessing the Keenetic, thereby depriving the child of the opportunity to manually change the settings. This is done just in the first block of the administration menu.
- Next comes a non-standard block – “WAN Parameters” , where you can change the server name, set a new MTU value, clone the MAC address, or limit the connection speed over the wire. If you do not know what a particular item is responsible for, it is better not to make any changes so that you do not have to reset the entire configuration later.
- The developers decided not to put the local network settings in a separate menu, so the LAN parameters are also set through administration. Here you can change the IP of the router, set a new subnet mask for it, disable the DHCP server, or edit the range of its addresses. Some users also need to set their preferred DNS addresses, which can also be entered here. We talked about the need to change these values in another article about setting up WDS for TP-Link. The same information is relevant for Tenda.
- In “Remove Web Management”, remote login to the router is configured, allowing the system administrator to connect to it without direct access. The default port is already set, so you don’t have to set it manually, but if you want to disable this mode, uncheck the corresponding item.
- It is imperative to make sure that the date and time settings are set correctly if you use a schedule to access Wi-Fi or activate parental controls. This is necessary in order for the router to correctly perform schedule tasks in accordance with real time.
- At the end of the menu in question there is a series of buttons responsible for performing certain actions with this network equipment. Next, we will describe in detail the purpose of each of them.
- “Reboot Router” – pressing this button immediately sends the router to reboot. It can be used if you need to restart the router, but do not want to go to it to press the physical button.
- “Reset to Factory Defaults” – performs a reset to the default settings. Relevant in cases where the user initially set the wrong router configuration, which caused problems with network access.
- “Backup a Configuration File” – saving a backup copy of the current settings as a separate file. Usually there is no point in creating it, since even in the event of an accidental reset of the parameters, most of them are set again in a few minutes. However, if you have set up prohibited parental control sites or a huge number of administration points and are afraid of losing all of them, it is better to make a copy and save it on your computer.
- “Restore a Configuration File” – use to load the file mentioned above if you want to restore the settings.
- “Export Syslog” – exports the router’s event log to a file, for which the correct time setting is also important.
- “Firmware Upgrade” – click on this button if you want to download a new version of the firmware, the file of which was previously downloaded from the official site.
Note the presence of Tenda’s proprietary mobile application, which can be used to set up a wireless network. You can download it from the Google Play Store or the App Store, connect it to the router’s Wi-Fi, and start configuring the current settings. Approximately according to the same principle, the program from TP-Link, which we talked about in another article on our website, works.
Read Also :
- How to enable IPv6 on an ASUS router or Wi-Fi mesh network
- How to enable and configure DDNS on a TP-Link Wi-Fi 6 router


